This post is going to be more of a catch-up post that includes what I've been toying about with and stuff relating to my course! Strap in for this one! I'll update on my course a bit more first.
We worked on both a horse run and walk for the past week. It was quite difficult compared to the dragon fly cycle. In particular, it was because horses are real creatures (believe it or not) and it's a lot easier to find reference that shows the intricacies of a horse's cycle. I used the same layered approach that I had been doing for my dragon cycle, and now my final project as well. Even though it does come with it's challenges, it's way better for me personally! I haven't gotten the chance to work on a human walk cycle with layered, but that's moreso because I spend so much time animating in class that I find it difficult to get started at home. That's one of the downsides of learning how to animate in a class setting. You do so much of it during the day that you don't really want to do anymore once you get home. I have gotten back into another hobby, though! I'll get into that later. With the final weeks of my course coming up, we've been focusing more and more on our animation projects. This is basically just us pitching a short animation and going through it for the rest of the course. I feel that once it's done, and I've cleaned up other animations I have, I'll have a pretty robust animation reel share! I definitely feel that because of the workflow I'm using, and all the great lectures I've gotten in the past weeks, my animation skills have increased exponentially! I've still got a long way to go, but I love learning, and I hope that I will be more confident to post things online to get feedback!
Because of how much animation in Maya over the past 9 weeks, I haven't really done much in terms of modelling either. Something that I've started to dabble with is procedural texture generation. This came about after doodling with Maya's Hypershade while bored in class and finding it lacking. The program that I've been predominately using for this is Material Maker, I'm planning to try out Substance Designer soon though, since I can get a free 12 month trial with my Uni email. Let's have a look at a few textures, shall we?
(It's a bit tricky to get the gif to loop, this is as good as I could get)
This texture was mostly just to get my bearings of what I already knew about using Material Maker, and to try and find a way to make a stylised texture going. I find a really cool what to make a fake stylised caustic effect by trudging through some forums! The way that I found was to get the borders of a voronoi texture, blur them, and then colour it using two colours that harshly connect to each other (no interpolation between the colours). This was done by using a colourise node in MM. It checks for anything that can be mapped from one side to the other (for example, a black and white gradient mapped to go from red to blue) and associates it with the desired colours. Because the colours I used didn't have any interpolation, it doesn't have any special information for shades that aren't either exactly white or black, so they get lumped into the colour for whichever shade they are the closest to. I suppose this is basically just what clamping if we're talking about it in colouring terms. A neat little trick that I did to get the second layer of caustics underneath the first was to actually have it above the main layer and change the opacity and blending type. I don't know what different blending types do exactly, but what I can say is that I think it made a pretty decent result!

This texture was heavily (HEAVILY) inspired by a shooting star sky material that I found in MM that I really liked the look of. This was lesson in figuring out other ndoes that weren't just the voronoi node. The main one that was used in this was the splatter node, where it randomly puts a specific shape around the canvas. As you can see, this was used to get the stars in the texture. This is another one that I really liked the end result of! I'm planning on using for a model for my current DND character, who is a Circle of the Stars druid, which can use starry form.

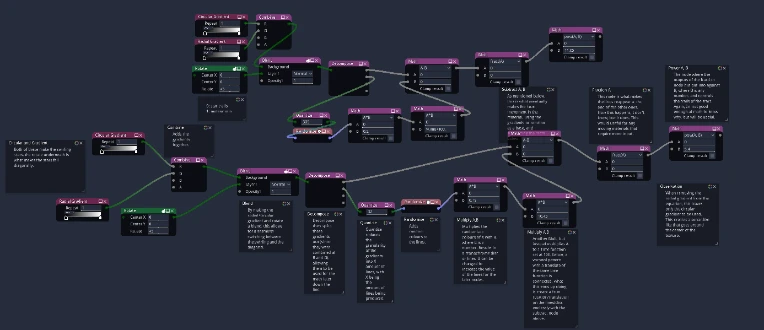
It's a bit hard to see, but this is me going through that aforementioned shooting star material and seeing what every node does and writing it down. This is just based on the observations of what happened by clicking on every node separately. One of the main problems that I came across is that the main part that makes the stars fall is near the end, where things like power and fractions are used. I know what these do separately, but I don't have a clue what they do when they related to colour, so that's still a bit of a mystery. I'm hoping that once I feel like getting into Designer that I can find some tutorials that will properly explain it. Another program that I found recently that I really want to try is called Illugen, by JangaFX. This program seems really fun to play around with! With all it's features, it seems super cool for making stylised weapon FX! That's probably a bit further down the road, once I gain my procedural gills.
Something that I mentioned earlier was that I'm finding it harder to work on 3D stuff now that I'm in class. I did some shadowing with an animator (which was really cool as well!) and they told me that with this line of work, it's good to have a hobby that isn't associated with staring at a screen. This, spurred on by a classmate who I now know paints, has reinvigorated my passion to start mini painting again!
For my first mini back into the hobby, I wanted to paint something that I consider non-committal. This basically just means that I wanted to paint something that I don't have an extreme interest in, and that I don't have an intention of actually playing with, when I get around to it.
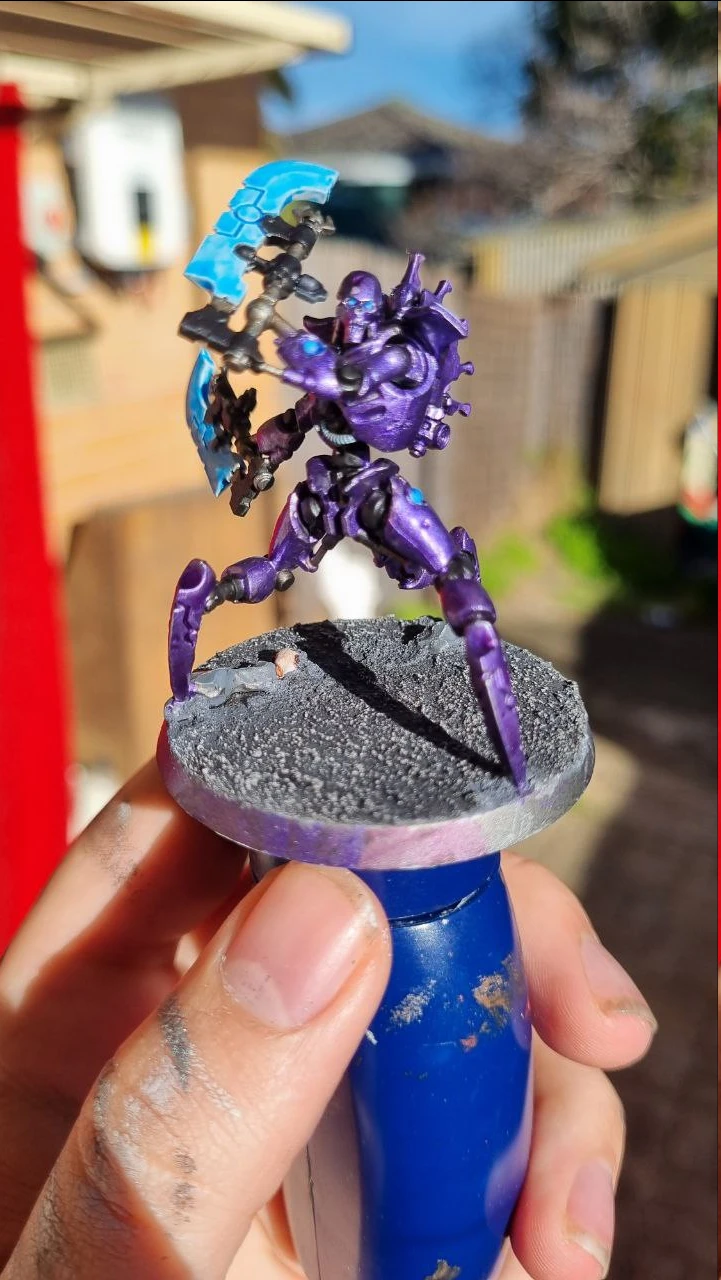
For this, I decided to paint a Necron Skorpekh Destroyer! The photo is a bit bad, but my phone doesn't like focusing on minis.

For those of you how know much about 40K, you might be wondering why it's such a weird yet striking and beautiful colour scheme? And to that I say...
Because I wanted to paint it that.
One of the things that I really like doing with my minis is making them with odd or interesting colours, with this one being one in particular. The paint that I used for it is actually one of my dad's super old paints from the 80s/90s! It was still perfectly moist, though he said it was because he might not have opened it ever. It not being opened in a while was definitely apparent, since the plastic lid for the tub had become super brittle. We eventually had to transfer it to an empty bottle that he luckily had on hand. I simply couldn't have that amazing paint go to waste. Especially considering that GW don't make it any more (for reference, it's Amethyst paint). Something that's really weird is that not a lot of paint vendors really do much metallics, which I personally think is a real shame because they can turn out really well when applied correctly! One of the other paints that I used was a special flouro blue paint for the glowing parts of the model. I'm still really iffy on this paint, because it acts more like a wash than a real paint. Because of this, it really needs to have a smooth base to slide onto. Conveniently, white is a very tricky paint to work with in general. It needs to be shaken a painfully long time, and needs to be watered down perfectly to go on smooth. Because I didn't water it down enough, one of the blades looks a lot worse. I think if I want to do a glowing effect next time, I'll try some other methods of doing it.
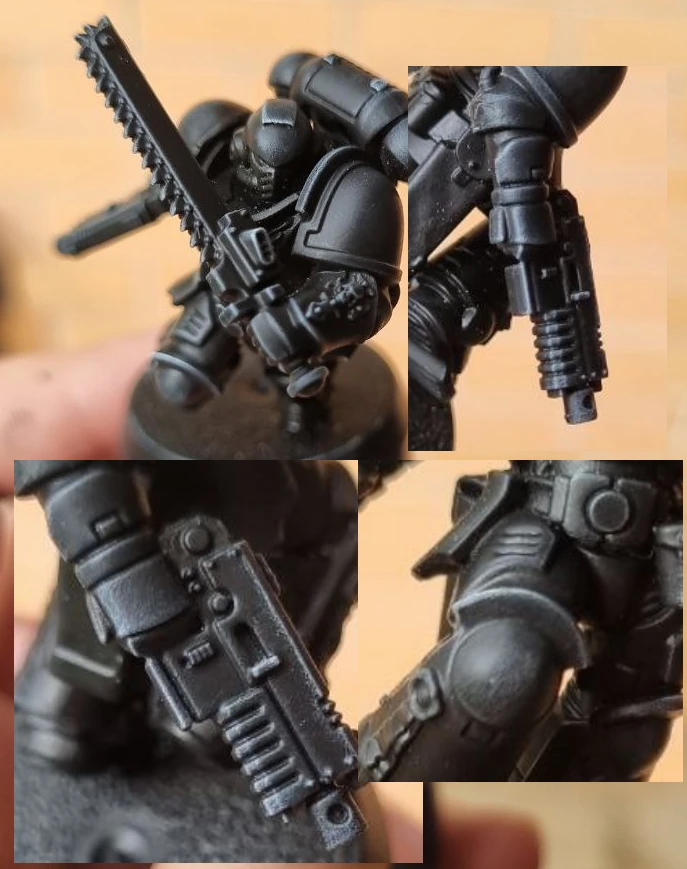
After I finished painting the Necron, I wanted to do something a bit more technical. So what I did was primed up a space marine black (another non-committal faction for me) and practiced my drybrushing. For those who aren't aware, it's basically just applying paint with no thinning via very veeeeeeeeeery light brushing with barely any paint. It's something that I tried in the past, but it didn't really click for me then. After watching a couple more videos and reading through some posts, I think I'm finally starting to get the hang of it.
Here's a little collage of my second attempt at drybrushing on this model. The first attempt that I did I didn't really like, so I tried a different approach than what I did before.

In particular, I really like how the drybrushing ended up on the left arm, chainsword, and right arm. It gives the model a very light edge highlight look that I really like. I also tried to do some slapchop shading on the model before I ended on this, but that had way more paint loaded onto the brush, so I opted to not do that, since I have a bit of trouble lightly brushing for drybrushing.
Something else that I've been getting into a lot more is various types of music! Very recently, I've actually been listening to a lot of Nine Inch Nails. I know that I sort of late to the party, but better late than never. The first NIN song I listened to was actually the single for the new Tron movie that's coming out. Since then I've gone back to listen to Pretty Hate Machine, Broken and The Downward Spiral. Downward Spiral is something that intrigues me in particular. It's such a visceral and angry album compared to what I listen to. There's so much hatred directed to society and the self. But I absolutely love it. One of the interesting things that I heard about one of the songs on the album, Closer, is that it actually got adopted as a sex anthem, despite how much of a negative song it ends up being. Also the fact that Trent Reznor bought a house where a prolific murder occurred and recorded the album in it? Which is pretty crazy, but from what I read, he seemed to wise up about it once he met a relative of the victim. I've also started to listen to a lot of Aphex Twin as well! His music is really relaxing to listen to when I need to get work done in class. It's got such an ethereal aura about it (which my dad called airy-fairy, but whatever...) that I absolutely love. I've also started listening to King Gizzard and the Lizard Wizard. I love how they make every album have something particularly special about it, especially Nonagon Infinity. I really do hope that I can get a lot of these artists on vinyl!


